Author Topic: Official Rebolting and Route Hardware suggestion thread  (Read 5548757 times)

JC w KC redux

  • Moderator
  • *****
  • Posts: 6634
  • my density has brought me to you...
Re: Official Rebolting and Route Hardware suggestion thread
« Reply #660 on: November 24, 2015, 12:13:10 PM »
Stretch Seven anchor - The middle bolt is one that someone added after the FA to supplement the original single bolt anchor - a star dryvin with a Leeper hanger. The unreported addition is a non stainless stud bolt (probably a wedge) with a stainless Metolius hanger in questionable rock – dull and hollow sounding. I left that bolt intact rather than destroying a patch of rock to remove it. I removed the original single bolt anchor but the deep cratering and poor surface were not conducive to reusing that location. I found some good rock about 2 feet lower for the new bolt. Based on the way the climb comes up, the only sensible location for the second anchor bolt was on the opposite side of the ridge. A follower can now climb up and easily pass the belayer, staying roped up for the “walkoff” if desired.

I didn’t have a rope, so I used my web-o-lette to rig the new setup/simulate a belay. The master point ended up right at a hole that you can sit in - and there are good footholds below to supplement the comfy belay “seat”.

All the hangers are turned in the direction of the belay pull since this anchor is not meant to be a rappel (the climb is listed as a walkoff in the guidebook).

I stopped by Bouldering Rock and replaced one of the anchor bolts on my way out. There were two old star dryvins – one with a very loose Leeper hanger and one with a SMC death hanger showing very little patina. I replaced the loose Leeper. The SMC hanger is just slightly loose (able to be turned but not floppy). I have seen folks belay their kids from this anchor, so I figured it was worthwhile to replace at least one of the bolts. I'll get to the other one another day.

the "walk" off  :yikes:


One wheel shy of "normal"

Bruce Hildenbrand

  • Moderator
  • *****
  • Posts: 257
Re: Official Rebolting and Route Hardware suggestion thread
« Reply #661 on: December 17, 2015, 10:28:05 PM »
Clint and I have been rebolting out at the Yaks.  We replaced the two protection bolts on the West Face of South Yak route and added two bolts with SS quick links and SS rings for rappel. On top we left the two original bolts from the 1951 ascent.  One was used to rappel off, the other was used for the Tyrolean over to the North Yak(and the first ascent of that pinnacle).  You can see the horn they probably lassoed to make the trip.  Those dudes back then were bad ass.

Here is the second protection bolt.  There are two just like it on top.


We also removed two Star Dryvins with SMC chromoly hangers on top that were added after the FA and in not a very good location and too far apart.  BTW, the first protection bolt on this climb was probably added after the FA (it was a 3/8" Star Dryvin with Leeper hanger with the sleeves under the hanger).  My guess is that the FA tied off the, now dead, bush/tree near that bolt.

On the South Face of South Yak we replaced the three bolts on the first pitch(1/4" wedge(?) bolts).  We replaced the belay bolt at the top of the 1st pitch and doubled it up then added SS quick links and SS rings for rappel.  No more gear needed for the belay.  On the second pitch we replaced the 1st and 5th bolt in the bolt ladder and also the two anchor bolts at the top of the pitch.  We added SS quick links and SS rings for rappel.  We didn't replace any bolts on the third pitch.

Here are several photos from the South Face.

1/4" wedge bolt with homemade hanger


This fixed pin looks like someone just pounded in one of the homemade hangers.


Swaged cable hangers which were used on almost all the bolts on this climb.


Lastly, we replaced two of the three bolts on the Beast of Burden rappel anchor.  The third bolt was nice slice of climbing history so we left it on display.

F4?

  • unworthy
  • Posts: 6176
Re: Official Rebolting and Route Hardware suggestion thread
« Reply #662 on: December 18, 2015, 12:35:02 AM »
Quote
We added two bolts with SS quick links and rappel rings on top of the rock for a rappel descent.  The bolts are located about 50 feet northwest of the two bolts added by Brad and Adam when they were up there a few years ago.  The bolts are right at the lip of the top of the wall and it is a bit sketchy getting down to them.  It is probably best to belay from a 5" oak about 80 feet above the bolts.  You can rap about 190' directly down to the top of Pitch 2 and then rap about 185' to the ground from there with double 60m ropes.

You might be able to get down with a single 70m by rapping about 110' to the top of pitch 3 then rapping about 75' to the top of pitch 2 then rapping about 100' to the top of pitch 1 and then 110' to the ground.  We didn't try this so all distances and feasibility is just a guess.

Or you can suffer like Jake and I did..having to walk back up and over in our climbing shoes. I even called 1800-Pinnacles beta to confirm our sad fate, "you need to walk back"
Great job and glad to you can rap off from the top.

I'm not worthy.

clink

  • Meanderthal
  • ****
  • Posts: 4103
Re: Official Rebolting and Route Hardware suggestion thread
« Reply #663 on: December 18, 2015, 06:42:22 AM »
Great report Bruce. Thank you for documenting the history so well in words and pictures.
Causing trouble when not climbing.

JC w KC redux

  • Moderator
  • *****
  • Posts: 6634
  • my density has brought me to you...
Re: Official Rebolting and Route Hardware suggestion thread
« Reply #664 on: December 19, 2015, 09:21:00 PM »
On the South Face of South Yak we didn't replace any bolts on the third pitch.

Here are several photos from the South Face.

This fixed pin looks like someone just pounded in one of the homemade hangers.

Swaged cable hangers which were used on almost all the bolts on this climb.

Bruce - I updated the Master List for Resurrection and Yaks and my recent stuff.
I just had a couple quick questions.

There is no 3rd pitch on the topo or in the description for the South Face - is that an error?

Are the fixed pins on the West Face reliable or mythical? (since Brad lists that section as the route crux).
That picture is disturbing.

Those bolt ladder bolts with the swaged cables look like hardware store junk - safety in numbers?


One wheel shy of "normal"

Bruce Hildenbrand

  • Moderator
  • *****
  • Posts: 257
Re: Official Rebolting and Route Hardware suggestion thread
« Reply #665 on: December 20, 2015, 11:59:01 AM »
Bruce - I updated the Master List for Resurrection and Yaks and my recent stuff.
I just had a couple quick questions.

There is no 3rd pitch on the topo or in the description for the South Face - is that an error?

Are the fixed pins on the West Face reliable or mythical? (since Brad lists that section as the route crux).
That picture is disturbing.

Those bolt ladder bolts with the swaged cables look like hardware store junk - safety in numbers?

There is the start of a 3rd pitch on the South Face.  Four bolts head out right, I am not sure if they go anywhere.  Previous parties were most likely looking up and not right when scoping where the route went next.

The fixed pins are OK, but not great.  You can get cams(take a #1.5-#3 Friend) to supplement the pro.  Also, you can tie off a good tree(which you then have to climb though!) above the second pin.  Clint and I thought the crux was the overhanging dihedral right after the 1st bolt.  There is a squeeze chimney above the 2nd pin which is also difficult, but the single hardest move(protected by a 1.5 Friend) is down low.  BTW, that is where the FA in 1951 used their only point of aid.

The swaged cables are just another in a long line of dirtbag climbing hardware.  Given that David Rubine mentions them in his guide, they have been up there for at least 25-30 years.

F4?

  • unworthy
  • Posts: 6176
Re: Official Rebolting and Route Hardware suggestion thread
« Reply #666 on: December 20, 2015, 04:21:29 PM »
Those swaged cables look just fine.
Never got a chance to try that route way back when.
I'm not worthy.

JC w KC redux

  • Moderator
  • *****
  • Posts: 6634
  • my density has brought me to you...
Re: Official Rebolting and Route Hardware suggestion thread
« Reply #667 on: December 20, 2015, 04:23:08 PM »
Thanks for such a complete response Bruce.
Maybe we should rename that route Road to Nowhere or Unfinished Business!
One wheel shy of "normal"

clink

  • Meanderthal
  • ****
  • Posts: 4103
Re: Official Rebolting and Route Hardware suggestion thread
« Reply #668 on: December 21, 2015, 04:37:17 AM »
Quote
Thanks for such a complete response Bruce.

He is so much more than a short story of a rare fish.
Causing trouble when not climbing.

clink

  • Meanderthal
  • ****
  • Posts: 4103
Re: Official Rebolting and Route Hardware suggestion thread
« Reply #669 on: January 02, 2016, 09:38:42 AM »
I am completely over 5- piece of ship spinners.

My new bit from Fixe drills very fast and seems slightly larger diameter than prior bits.
Causing trouble when not climbing.

Bruce Hildenbrand

  • Moderator
  • *****
  • Posts: 257
Re: Official Rebolting and Route Hardware suggestion thread
« Reply #670 on: January 06, 2016, 12:43:49 AM »
I have been corresponding with Greg Barnes of the ASCA about the problem we have been seeing with 5-piece spinners.  Greg sent me a photo of an old 5-piece bolt(right) and new 5-piece bolt(left).  You can see that the cone construction is clearly different between the two.  He believes, as we do, that this is a design/production problem.


Also, Greg wrote me today to say that rebolters at Red Rocks are reporting the same problem with the 3/8" bolts.  BTW, the ASCA is providing 1/2" bolts for areas that allow power drills.  Because we have to hand drill at the Pinnacles this is one of the few places which he sends 3/8" bolts.  That is probably why this isn't more widely recognized as a problem.

As we have seen with the bolts at the Pinnacles it appears to be the act of pounding the bolt into the hole which causes the damage to the cone.  Some of us have been able to funk out the spinner bolt and put a new bolt in the same hole and have it tighten up.  Of course, the act of pounding in the old bolt and also funking it out has made the hole a bit larger for the new bolt.  I think the tolerances here are very close as Greg Barnes indicated that drilling a 10mm hole(.394" vs .375") is too big for a 3/8" bolt and it will not tighten properly.

One of the potential solutions is to switch to 1/2" bolts.  Unfortunately, the 1/2" bolts are 2.75" in length rather than 3.5" in length.  My personal feeling is that the 3/8" diameter is fine and there is no reason to
go to 1/2".  I prefer the longer length, 3.5" vs 2.75", as the deeper in soft rock the better.  Also, though cost really isn't a big issue, the 3/8" bolts are way cheaper.

Greg has a bunch of different manufacturer of drill bits and he is going to see if there is a difference as Clink mentioned.  That could be a critical factor.

mynameismud

  • unworthy
  • Posts: 5985
    • Mudncrud
Re: Official Rebolting and Route Hardware suggestion thread
« Reply #671 on: January 06, 2016, 02:08:52 AM »
I agree with 3/8 over 1/2.
Here's to sweat in your eye

clink

  • Meanderthal
  • ****
  • Posts: 4103
Re: Official Rebolting and Route Hardware suggestion thread
« Reply #672 on: January 06, 2016, 03:44:42 AM »
1/2   0.5000 in = 12.7000 mm

3/8   0.3750 in = 9.5250 mm

May be time to try Triplex. The bolt of the future for Pinnacles?

Quote
Description
The Fixe Triplex bolt was designed specifically for rock climbing. Triplex is the highest quality climbing bolt available. Triplex uses the same expansion principal as the Rawl 5-Piece bolt. Triplex takes anchoring a step further by eliminating the nose cone with a solid stud system. This design allows Easy Removal for replacement and consists of only 3 Parts. The sleeves expand by tightening the nut which draws the tapered stud from the hole. This system places the threads outside of the rock eliminating hidden thread and nose cone corrosion. The Stainless Steel model is suited for the most corrosive limestone. Triplex can be easily inspected for corrosion by quickly removing the entire unit. This bolt can be used in soft and pocketed rock. Triplex can also be utilized to equip a Glue-In anchor using the same hole size for both bolts. Triplex bolts are reusable!

T424

CE/UIAA Certified
12x75mm
Weight: 80g
304 Stainless Steel
12mm Bolts TORQUE TO: 25 Foot Pounds / 35Nm

Quote
Home > Climbing Hardware > Bolts
 Print
Fixe SS  12 x 75mm Triplex 3-Piece Bolt
 
Fixe SS 12 x 75mm Triplex 3-Piece Bolt
Product ID : T424
Sale Price: $6.00
Compared at: $7.50
You Save: $1.50
0 review(s)
E-mail to a friend

Quantity
1
Product is out of stock
Submit


2.9528 in = 75.0000 mm


I wonder how long it would take to drill a 12mm x 3 1/8in hole vs. the 3/8 x 4in hole we are currently drilling?

Instead of chopping a route, it could be removed and used to equip your much better project as JC pointed out to me in less words concerning use of Triplex.

 Bruce, a picture is worth a thousand words. Thanks for inquireing and the facts so far.

 I bought the last set of bits and bolts from Fixe in the same order. I don't think Fixe has a clue about the tolerances of what they are actually selling/shipping. Last order I was wailing on the bolt to drive it in the hole with a new bit. the 5-piece spinner I removed last weekend pulled easily, way too easily.
Causing trouble when not climbing.

mynameismud

  • unworthy
  • Posts: 5985
    • Mudncrud
Re: Official Rebolting and Route Hardware suggestion thread
« Reply #673 on: January 06, 2016, 06:52:06 AM »
 I have not drilled a lot of 1/2 inch holes in the Pins but i have drilled a few.  Definitely more work.  Seems it would be mandatory to locktite the threads.
Here's to sweat in your eye

JC w KC redux

  • Moderator
  • *****
  • Posts: 6634
  • my density has brought me to you...
Re: Official Rebolting and Route Hardware suggestion thread
« Reply #674 on: January 06, 2016, 12:42:15 PM »


I knew I should have gone to school for mechanical engineering instead of Geology.
I’m not going back to grad school. I worked enough with engineers at Toyota.
I agree that the design is a problem.
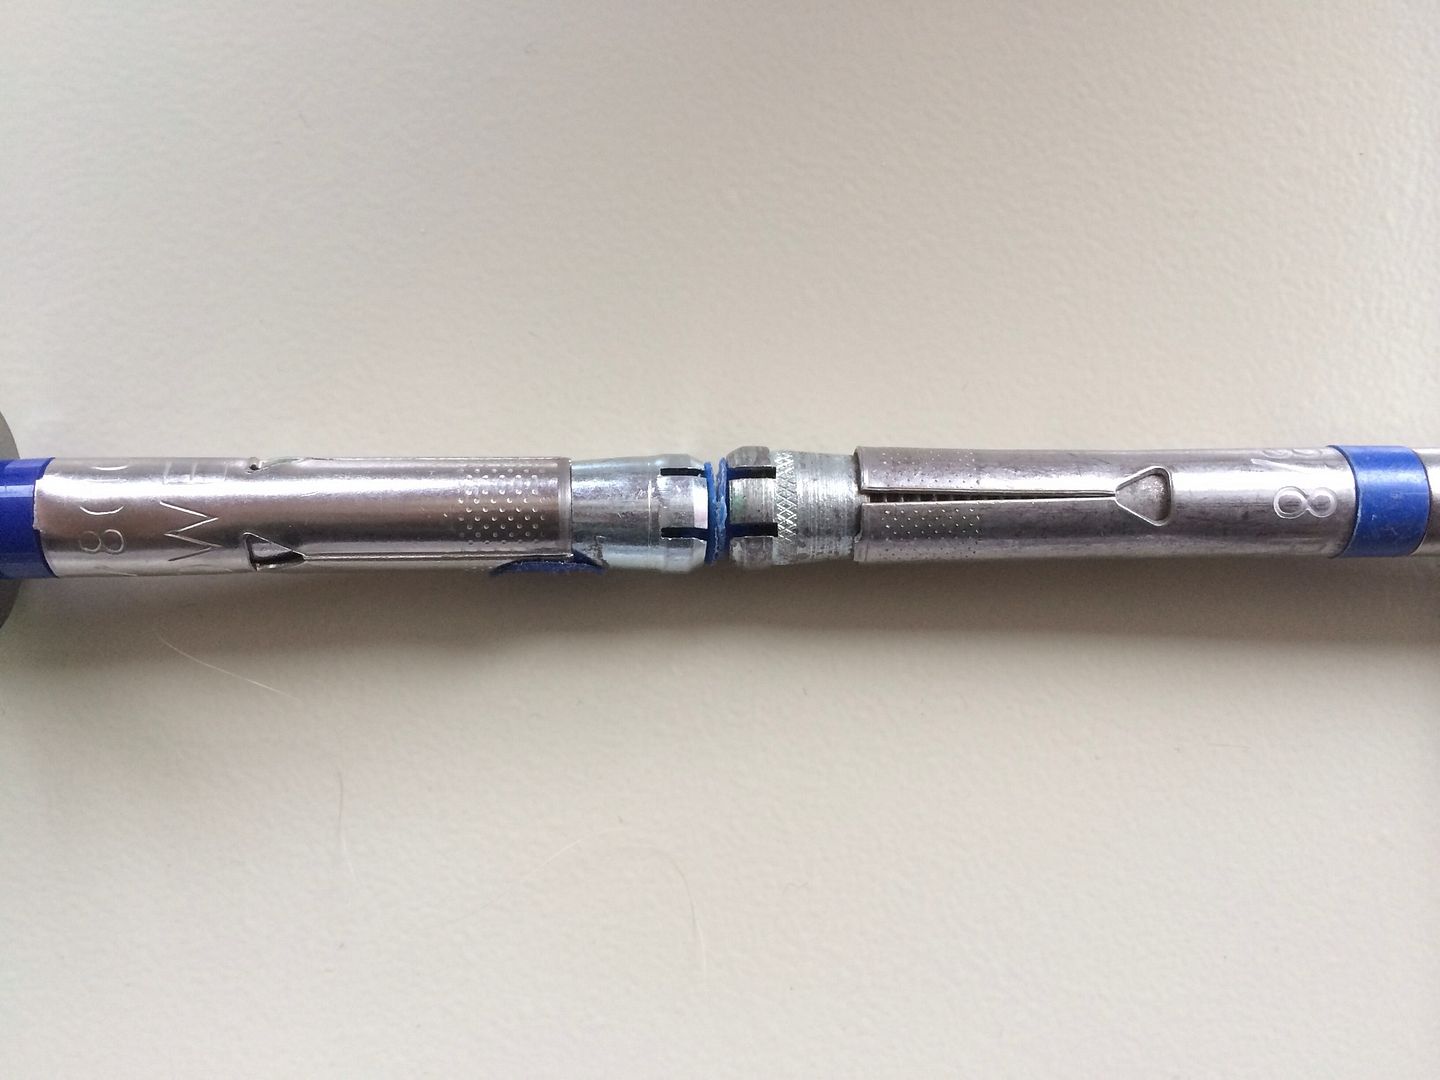
The old bolt in Bruce’s pic has some knurling on the cone and the cone appears to have bigger slits. Both of the cones have a little bump-up in diameter just before the slits.  What is the purpose of this bump? Is that the stop point for the cone entering the sleeve?

The description from Powers for how this bolt operates/tightens/expands reads as follows: Expansion occurs at two locations within the drilled hole. First, the cone is pulled into the large triple-tined expansion sleeve, developing a mid-level compression force. Further turning causes the threaded bolt to advance into the threads of the expander cone, forcing its four sections outward. This action engages the base material deep in the anchor hole, greatly increasing the holding power of the Power-Bolt. The bolt and cone remain locked together which prevents loosening under vibratory conditions.

Isn’t this the problem? If the bolt and cone lock together – then further attempts to tighten are going to spin the assembly. One of the problems with the soft Pinns rock is that after you get the bolt to start snugging up, the soft surface under the bolt starts crumbling – or simply crumbles a little from the compressional force of the bolt. You think – oh crap – the hanger is still loose - so you keep trying to tighten it. If you’ve tightened the bolt to the point that the bolt and cone are locked and that causes the surface to crumble a little - then when you try to snug it up again – it just spins – and you think the whole thing is loose.

The torque on these bolts is only 12 foot pounds. That isn’t much.
The installation instructions say to tighten 3 to 4 turns past finger tight.
Do you think maybe we are just overtightening the bolts that spin?
I use a short/mini ratchet handle to try to avoid too much force.
I don’t particularly want to carry a torque wrench but that may be what it comes down to – or at least get one to tighten a few bolts so I can see what 12 foot pounds feels like.


One thing that has always bothered me is the fact that the bolts are labeled as 3/8 (10mm) on the sleeve – it’s stamped right on every bolt. Just for the heck of it I shoved the nose cone fully into the sleeve and at that point the sleeve measures slightly more than a half inch in diameter. I don’t believe that is the design intent but it certainly shows how far the cone could expand in the back of the hole IF the bolt could spin completely through the nose cone - also probably not the design intent since the cone is designed to smash slightly along the slits and lock the bolt (anti-vibration feature). We have speculated at times that spinners might happen when the back of the hole blows out.

The slits in the nose are designed for anti-vibration situations like mounting motors, compressors etc. They are unnecessary for climbing applications in my opinion.

We need a bolt that has a nose cone without the slits.

Once the spinning condition sets in, you may or may not be able to unscrew the bolt from the cone. I have successfully removed several of these spinners and every one of them has a deformed cone that will not allow the bolt to pass through – the bolt and cone locked together as intended by the design.

The easiest and cheapest way to avoid this scenario is to have a solid nose cone.

The other facet I investigated was the installation procedure. Advancing the cone slightly into the sleeve before driving the bolt seems to be a mistake/causes problems.
The Powers installation diagram specifically says not to do it.
Occasionally I have had bolts that are tight immediately after being driven in. I believe this condition is a result of the upper edge of the nose cone catching on the lower edge of the sleeve. When that happens, the nose cone doesn’t go up into the sleeve.
What I have been doing lately is checking to make sure the nose cone advances smoothly into the sleeve prior to driving the bolt. I screw the cone up into the sleeve to make sure it is operating smoothly and then back it off and disengage the cone from the sleeve just before I drive the bolt into the hole. Additionally, I try to be very careful about how the bolt is started. I tap it gently to get the nose cone in the hole and then make sure the bolt is aligned with the hole for the rest of the driving process.

Here are some screenshots from the Powers website.


The Triplex bolts would be a huge improvement over trying to deal with all the finicky intricacies of the 5 piece sleeve bolts and it would eliminate all this speculation and mystery. That bolt combines the best parts of both wedge bolt and sleeve bolt design (one piece stud and solid cone + a single removable sleeve). Simple, strong and elegant – and currently out of stock on the Fixe website. The downside is the bigger hole. One upside is if the hanger becomes loose over time, the bolt can be retightened. I have seen multiple cases of tight 5 pc bolts with loose hangers. Once the bolt and nose cone lock, there is no way to retighten the bolt and get the hanger snug again – unless you try loosening and pounding the bolt in farther – that’s providing the bolt and nose cone aren’t frozen and you’re okay playing with fire. The soft/friable surfaces under the hangers aren’t going away.   


One wheel shy of "normal"

mynameismud

  • unworthy
  • Posts: 5985
    • Mudncrud
Re: Official Rebolting and Route Hardware suggestion thread
« Reply #675 on: January 06, 2016, 02:46:02 PM »
One question I have, is the cone spinning or are you stripping the cone due to over tightening.  I do not make the bolts real tight since the cone is soft aluminum.  I know at least one bolt in the past (years ago) I stripped.  I cranked down on it gave it just a bit more then it spun easy.  I am confident I over tightened and stripped the cone.  12 pounds is not a lot of force especially with a ratchet.  I bet most of the bolts being put it in, including my own,  are tightened to more than 12 ft/lbs.  I have not used a torque wrench lately but used one a fair bit growing up.

The cone has to have the slits so it can expand as the bolt is threaded through.  It is the same idea as the Triplex bolt, the aluminum sleeve has a slit on each side. 

I will let you know when I get a spinner.
Here's to sweat in your eye

JC w KC redux

  • Moderator
  • *****
  • Posts: 6634
  • my density has brought me to you...
Re: Official Rebolting and Route Hardware suggestion thread
« Reply #676 on: January 06, 2016, 03:25:51 PM »
Definitely not stripping the cone. I have examined threads on all failed bolts and cones.
All parts of the bolts are stainless steel. There isn't any aluminum.
One wheel shy of "normal"

mynameismud

  • unworthy
  • Posts: 5985
    • Mudncrud
Re: Official Rebolting and Route Hardware suggestion thread
« Reply #677 on: January 06, 2016, 03:36:51 PM »
ok, got it.  i assumed the cone would be aluminum.
Here's to sweat in your eye

mungeclimber

  • PermaBan
  • ***
  • Posts: 6709
    • http://www.sonorapassclimbing.com
Re: Official Rebolting and Route Hardware suggestion thread
« Reply #678 on: January 06, 2016, 03:53:17 PM »
From the pic, what exactly is the issue in difference between old and new?

Sorry, not feeling well but intensely curious.
On Aid at Pinns... It's all A1 til it crumbles. - Munge

mynameismud

  • unworthy
  • Posts: 5985
    • Mudncrud
Re: Official Rebolting and Route Hardware suggestion thread
« Reply #679 on: January 06, 2016, 04:08:15 PM »
the old one is knurled, then slots are just a bit bigger and the cone perhaps a tad larger in diameter.  If I had both styles I would take a micrometer to them.  In the pictures they are offset just a tad and I am not sure if this skews the perspective.
Here's to sweat in your eye